Table of Contents Show
Let’s be real—showing up to a track meet with hair that’s in the way is a special kind of annoying. You’re already worrying about your race, the weather, and if you remembered your spikes. The last thing you need is hair sticking to your sunscreen or flyaways whipping into your eyes during the 200-meter dash.
I’ve spent plenty of mornings standing in front of the mirror with a hair tie in my mouth, trying to figure out a style that won’t budge but also won’t give me a headache by the third event.
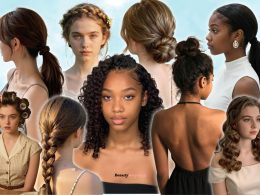
This list rounds up 15 hairstyles that balance speed (easy to do when you’re half-asleep) with real comfort, so you can stay focused on the finish line.
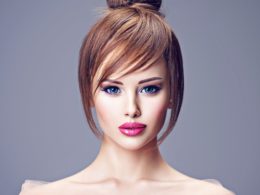
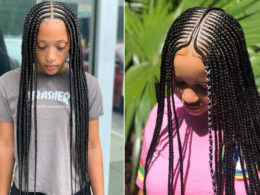
1. Textured Low Bun

This style is sleek from the front but has a soft, slightly undone look at the back that reads as effortlessly put-together. It’s a total lifesaver for second-day hair that needs to be tamed fast.
What you need:
- Texturizing spray
- Soft bristle brush
- Spiral hair ties
- Strong-hold hairspray
How to style it:
Step 1: Spray texturizing spray liberally through your roots and mid-lengths to add grip.
Step 2: Gather hair at the nape of your neck and twist it into a loose rope, then wrap it around itself to form a bun.
Step 3: Secure with a spiral hair tie—they grip better than regular elastics and prevent bulges.
Step 4: Mist with strong-hold hairspray and gently pull out a few face-framing pieces for softness.
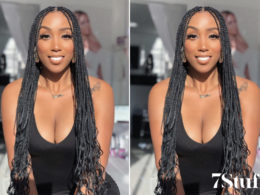
2. High Ponytail with Wrap-Around

This isn’t just a ponytail; it’s a sleek, lifted style that stays put from the first warm-up to the last cool-down. It’s ideal for anyone with medium to long hair who wants to keep every strand off their neck.
What you need:
- Boar bristle brush
- Strong elastic band
- Hairspray
- Bobby pins (matching your hair color)
How to style it:
Step 1: Flip your head upside down and brush all hair forward with a boar bristle brush to smooth out bumps.
Step 2: Flip back, gather hair at your crown, and secure tightly with a strong elastic band.
Step 3: Take a small section of hair from the ponytail, wrap it around the base to hide the elastic, and pin it underneath with bobby pins.
Step 4: Spray the roots with hairspray to smooth flyaways and give the ponytail extra hold.
3. Dutch Braid Crown

This style looks intricate but feels like wearing a comfortable headband that won’t slip. It keeps hair completely off the face and is perfect for medium to long hair that tends to get frizzy.
What you need:
- Wide-tooth comb
- Light pomade or wax stick
- Clear elastic bands
- Bobby pins
How to style it:
Step 1: Create a deep side part with a wide-tooth comb and smooth down flyaways with a light pomade along the hairline.
Step 2: Starting at the part, Dutch braid (braiding under, not over) along your hairline, following the curve of your head.
Step 3: Continue braiding down to the nape, then secure the end with a clear elastic band.
Step 4: Tuck the end of the braid behind your ear and pin it discreetly with bobby pins to hide the tail.
4. Bubble Ponytail

The bubble ponytail is a playful upgrade to the basic ponytail that looks way harder to do than it actually is. It’s great for thick hair that might weigh down a regular ponytail and adds a fun touch without extra time.
What you need:
- Detangling spray
- Small clear elastics (at least 5-6)
- Rat-tail comb
- Hair oil
How to style it:
Step 1: Spray hair with detangling spray and pull it into a high, slick ponytail secured with an elastic.
Step 2: Use a rat-tail comb to section the ponytail into 4-5 even segments; add an elastic around each section to create “bubbles.”
Step 3: Gently tug at each section between the elastics to puff them out into round bubbles.
Step 4: Run a tiny drop of hair oil over each bubble to add shine and smooth the surface.
5. Slicked-Back Low Pony with Middle Part

This is the minimalist’s dream—clean, architectural, and done in under two minutes. It works for all hair lengths and textures, especially when you want to look intentional without trying too hard.
What you need:
- Wet brush
- Strong-hold gel
- Fine-tooth comb
- Satin scrunchie or elastic
How to style it:
Step 1: Create a precise middle part using a fine-tooth comb while hair is slightly damp.
Step 2: Apply strong-hold gel to your palms and smooth it over your entire head, brushing back with a wet brush to eliminate bumps.
Step 3: Gather hair at the nape and secure with a satin scrunchie to avoid creases.
Step 4: Smooth any remaining flyaways with a tiny bit more gel and let it air-dry for a cast-iron hold.
6. Double French Braids

Double French braids are the ultimate “set it and forget it” style for practice and meets alike. They distribute weight evenly so your head doesn’t hurt, and they keep hair totally contained, even during distance runs.
What you need:
- Leave-in conditioner spray
- Hair elastics (2)
- Edge control or wax stick
- Silk scrunchie (to tie ends if needed)
How to style it:
Step 1: Mist damp hair with leave-in conditioner and part it straight down the middle from forehead to nape.
Step 2: French braid each section close to the scalp, starting at the front and incorporating hair evenly as you go down.
Step 3: Secure the ends with hair elastics and use edge control to smooth baby hairs at the temples.
Step 4: Gently pancake the braids by pulling at the edges to make them look fuller and softer.
7. Claw Clip Twist

This style proves that a simple claw clip can be the most elegant (and fast) solution for pre-race nerves. It’s best for shoulder-length to long hair when you need it up in two seconds flat.
What you need:
- Texturizing powder
- Medium-sized claw clip (teeth should be strong)
- Hairspray
- Fingers (no brush needed)
How to style it:
Step 1: Sprinkle texturizing powder at the roots for volume and grip, then tousle with your fingers.
Step 2: Twist all hair upwards loosely and fold it against your head.
Step 3: Secure by clamping a medium-sized claw clip vertically over the twist.
Step 4: Shake your head slightly to loosen pieces and mist with hairspray for casual hold.
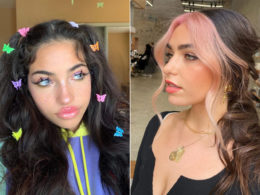
8. Braided Pigtails

Braided pigtails are youthful, practical, and keep hair from rubbing against your neck during warm-ups. They work wonders for medium-length hair and look super cute with running hats or visors.
What you need:
- Detangling brush
- Small elastics (2-4)
- Anti-humidity spray
- Ribbon or colorful bands (optional)
How to style it:
Step 1: Brush hair smooth with a detangling brush and create a clean middle part.
Step 2: Gather each side into a low ponytail at ear level and braid all the way down.
Step 3: Secure each braid with small elastics and spritz with anti-humidity spray to keep frizz away.
Step 4: For fun, tie a small ribbon or use colorful bands at the ends for a pop of personality.
9. Messy Top Knot

The messy top knot is the lazy girl’s hero—it looks stylishly undone but keeps hair completely off your face and neck. It’s perfect for days when you hit snooze one too many times.
What you need:
- Dry shampoo
- Scrunchies (thick fabric kind)
- Bobby pins
- Soft-hold hairspray
How to style it:
Step 1: Spray dry shampoo at the roots for instant texture and volume.
Step 2: Flip head over, gather hair into a high ponytail without brushing (use your hands only), and twist the ponytail around itself.
Step 3: Secure with a scrunchy—if it feels loose, use bobby pins to anchor flyaway pieces.
Step 4: Pull out a few strands around the ears and mist with soft-hold hairspray so it doesn’t look stiff.
10. Fishtail Braid

The fishtail braid looks like you spent twenty minutes on it, but it’s just as fast as a regular braid once you get the hang of it. It holds really well in fine or slippery hair that normal braids slide out of.
What you need:
- Detangling spray
- Small clear elastic
- Shine serum
- Rat-tail comb
How to style it:
Step 1: Brush hair to one side and mist with detangling spray for slip.
Step 2: Split hair into two sections; use your index finger to pull a small strip from the outside of the left section and cross it over to the right. Repeat, alternating sides.
Step 3: Continue down to the ends and secure with a small clear elastic.
Step 4: Apply shine serum to your palms and gently run them over the braid to smooth flyaways.
11. Low Knot with Volume

This style gives you the sophistication of a bun with the comfort of a knot—no pins stabbing your head. It’s ideal for medium-length hair that’s long enough to tie but too short for a massive bun.
What you need:
- Volumizing mousse
- Blow dryer
- Hair elastics (2)
- Soft bristle brush
How to style it:
Step 1: Apply volumizing mousse to damp roots and blow-dry upside down for lift.
Step 2: Gather hair into a low ponytail, but on the last loop of the elastic, only pull the hair halfway through to create a loop (a knot).
Step 3: Take the dangling ends, wrap them around the base of the knot, and tuck them in.
Step 4: Use a soft bristle brush to smooth the top and secure with a second elastic if needed.
12. Rope Braid Ponytail

This combines the best parts of a braid and a ponytail into one twisted style that won’t budge. It’s fantastic for active warm-ups because the twist hugs the hair tighter than a standard braid.
What you need:
- Heat protectant spray
- 1-inch curling wand (optional for pre-curl)
- Strong elastic
- Hairspray
How to style it:
Step 1: Spray hair with heat protectant and optionally add loose waves with a 1-inch curling wand for texture.
Step 2: Gather hair into a high ponytail and secure with a strong elastic.
Step 3: Split the ponytail into two sections and twist each section individually in the same direction, then twist both sections around each other in the opposite direction.
Step 4: Secure the end with another small elastic and mist with hairspray for hold.
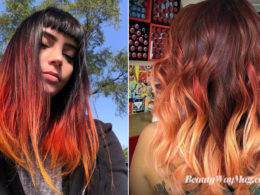
13. Braided Headband

This gives you the look of a braid without having to put all your hair up, making it perfect for shorter layers or when you want to wear your hair down but keep it out of your face.
What you need:
- Rat-tail comb
- Small elastics (2)
- Bobby pins
- Light hairspray
How to style it:
Step 1: Use a rat-tail comb to section off a triangular piece from just behind your ear to your part on one side.
Step 2: Braid that section loosely and secure the end with a small elastic.
Step 3: Drape the braid across the top of your head like a headband and pin the end behind your opposite ear with bobby pins.
Step 4: Let the rest of your hair hang loose and set with light hairspray.
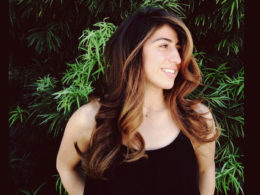
14. Twisted Half-Up

This is the perfect compromise between “I did my hair” and “I’m comfortable.” It pulls hair away from your face while leaving length down, and it works on basically every hair type.
What you need:
- Sea salt spray
- Small clear elastics (2)
- Bobby pins
- Shine spray
How to style it:
Step 1: Spritz sea salt spray throughout for beachy texture and volume.
Step 2: Take a section from each temple, twist them toward the back, and meet in the middle.
Step 3: Secure the twists together with a small clear elastic or criss-cross with bobby pins.
Step 4: Finish with shine spray for a glossy look and gently pull out a few front pieces.
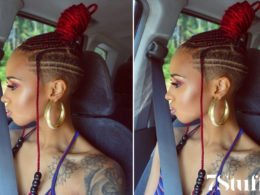
15. Sleek Space Buns

Space buns are fun, functional, and keep hair completely off your shoulders and neck during warm-ups. They’re especially great for dancers or runners who want full range of motion without hair in the way.
What you need:
- Smoothing cream
- Boar bristle brush
- Hair elastics (2)
- Strong-hold hairspray
How to style it:
Step 1: Apply smoothing cream to damp hair and create a precise middle part with a boar bristle brush.
Step 2: Gather each side into high ponytails at your crown, then twist each ponytail and wrap into tight buns.
Step 3: Secure each bun with hair elastics and tuck ends underneath.
Step 4: Spray generously with strong-hold hairspray and smooth down any flyaways with a dab more cream.