

Table of Contents Show
Here’s the thing about headbands and curly hair—they’re not just accessories, they’re problem-solvers. Bad hair day? Headband. Growing out bangs? Headband. Need to look put-together in two minutes? Headband. But if you have curls, you also know the struggle of finding headbands that actually stay put and styles that work with your texture instead of flattening it.
Beauty For The Modern Woman
The right headband can elevate your curls, add a pop of color, and keep hair off your face all at once.
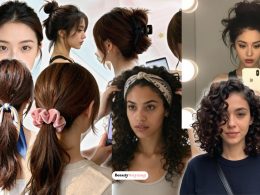
These 15 styles prove that headbands and curls are a match made in heaven, whether you’re going for boho, polished, or somewhere in between.
1. The Classic Knotted Headband with Volume

This is the headband style that started it all—a fabric knotted headband sitting right at the hairline with curls flowing free underneath. It’s effortlessly chic and takes about ten seconds.
How to style it:
- Step 1: Style your curls as usual with your favorite products for volume and definition.
- Step 2: Choose a knotted fabric headband in a color that complements your outfit.
- Step 3: Place it about an inch behind your hairline, pushing it forward slightly to create lift at the crown.
- Step 4: Arrange a few curls to fall over the band at the temples for softness.
2. The Thin Metal Headband with Defined Curls

A thin metal or wire headband adds a touch of elegance without overwhelming your curl pattern. It’s perfect for dressing up your curls for work or dinner.
How to style it:
- Step 1: Define your curls with a gel or cream and diffuse until fully dry.
- Step 2: Choose a thin metal headband—gold, silver, or rose gold work beautifully.
- Step 3: Place it carefully over your curls, positioning it about halfway back on your head.
- Step 4: Let it sit slightly loose so it doesn’t flatten your curls at the crown.
3. The Thick Fabric Headband with Pineapple Puff

This combo pairs a chunky, thick fabric headband with a high curly puff. It’s cozy, cute, and keeps every strand off your face and neck.
How to style it:
- Step 1: Gather all your curls into a high pineapple puff at your crown.
- Step 2: Secure with a soft scrunchie, leaving the puff voluminous.
- Step 3: Choose a thick fabric headband in a complementary color.
- Step 4: Slide it over your head, positioning it just behind your hairline and in front of the puff.
4. The Scarf Headband Wrap

Using a silk scarf as a headband adds color, pattern, and personality to your curls. It’s endlessly customizable and looks intentionally styled.
How to style it:
- Step 1: Style your curls with volume and definition.
- Step 2: Fold a square silk scarf into a long strip, then fold again width-wise.
- Step 3: Place the center at your nape and bring ends up to your forehead.
- Step 4: Tie the ends in a knot or bow at your hairline, letting the tails hang or tucking them under.
5. The Half-Up Curly Style with Headband

This style combines a half-up twist or ponytail with a headband for double the face-framing power. It’s romantic and practical.
How to style it:
- Step 1: Take small sections from each temple and gather them at the back, securing with a pin or small elastic.
- Step 2: Choose a headband—fabric or metal works.
- Step 3: Place the headband behind the half-up section, letting it rest at your hairline.
- Step 4: Arrange the half-up curls to blend with the headband and let the rest hang loose.
6. The Curly Bangs with Thin Headband

If you have curly bangs, a thin headband can help train them while adding style. It keeps shorter pieces back without flattening them completely.
How to style it:
- Step 1: Define your curly bangs with a small amount of curl cream.
- Step 2: Choose a thin, non-slip headband.
- Step 3: Place it about an inch behind your hairline, letting your bangs fall forward over it or tucking them behind.
- Step 4: Adjust so the band sits comfortably without crushing your curl pattern.
7. The Headband with Loose Wash-and-Go

Sometimes the simplest combination is the best—your natural wash-and-go curls plus a pretty headband. It elevates everyday curls instantly.
How to style it:
- Step 1: Let your curls air-dry or diffuse with your usual products.
- Step 2: Choose a headband that complements your outfit.
- Step 3: Place it gently over your curls, positioning it where it feels comfortable.
- Step 4: Fluff your curls slightly after placing to restore any flattened volume.
8. The Curly Pineapple with Knotted Headband

The pineapple gets an upgrade with a knotted headband wrapped around the base. It’s cute, functional, and perfect for second or third-day curls.
How to style it:
- Step 1: Gather your curls into a high pineapple at your crown.
- Step 2: Take a knotted fabric headband and place it around your head, positioning it just behind the hairline.
- Step 3: Let the knot sit at your forehead or to the side.
- Step 4: Fluff the pineapple curls for maximum volume.
9. The Low Curly Bun with Headband

A low bun paired with a headband is polished, elegant, and perfect for work or special occasions. It keeps curls contained while the headband adds interest.
How to style it:
- Step 1: Gather all curls into a low bun at your nape, securing with pins.
- Step 2: Choose a headband—metal or thin fabric works best for this look.
- Step 3: Place the headband over your head, positioning it about an inch behind your hairline.
- Step 4: Leave a few face-framing pieces out if desired.
10. The Headband with Curly Space Buns

Space buns and headbands together? Yes, please. This playful combo is perfect for festivals, weekends, or anytime you want fun energy.
How to style it:
- Step 1: Create two curly space buns at your crown.
- Step 2: Choose a thin or medium-width headband.
- Step 3: Place it behind the buns, letting it rest at your hairline.
- Step 4: Adjust so the buns sit forward of the band for maximum visibility.
11. The Twisted Front with Headband

This style twists small sections at the front before adding a headband for extra detail. It’s simple but looks intentionally styled.
How to style it:
- Step 1: Take a small section from each temple and twist them toward the back.
- Step 2: Secure the twists together at the back with a small pin or let them hang.
- Step 3: Place a headband over your head, positioning it just behind the twisted sections.
- Step 4: Arrange the twists to blend with the band.
12. The Headband with Curly Pony

A high or mid-height curly ponytail gets an instant upgrade with a headband. It adds polish to a simple style in seconds.
How to style it:
- Step 1: Gather your curls into a ponytail at your desired height.
- Step 2: Choose a headband that complements your look.
- Step 3: Place it over your head, positioning it just behind your hairline.
- Step 4: Fluff the ponytail curls and pull out a few face-framing pieces.
13. The Slick Edges with Headband

This style combines laid edges with a headband for a clean, polished look that still shows off your curl pattern.
How to style it:
- Step 1: Apply edge control to your hairline and smooth back with a soft brush.
- Step 2: Let your curls hang loose or style as desired.
- Step 3: Choose a headband and place it just behind the slicked edges.
- Step 4: Smooth any flyaways and let the contrast between slick edges and curly length shine.
14. The Headband with Curly High Puff

A high puff and a headband is a match made in heaven. The band adds color and detail while the puff shows off your volume.
How to style it:
- Step 1: Gather all curls into a high puff at your crown.
- Step 2: Choose a headband in a color that pops against your hair.
- Step 3: Place it around your head, positioning it just behind your hairline.
- Step 4: Fluff the puff for maximum volume and adjust the band as needed.
15. The Double Headband Style

Why stop at one when you can wear two? Layering thin headbands creates a bold, intentional look that’s perfect for making a statement.
How to style it:
- Step 1: Style your curls with volume and definition.
- Step 2: Choose two thin headbands in complementary or matching colors.
- Step 3: Place the first band about an inch behind your hairline.
- Step 4: Place the second band slightly behind the first, creating a layered effect.