Table of Contents Show
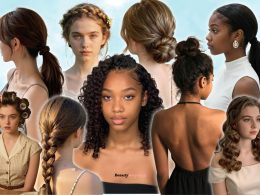
4C hair is made for wedding styles. It can look full, sculpted, soft, or sleek, and it holds shape beautifully when it’s prepped well. The only tricky part is choosing a style that feels special, stays secure through a long day, and works with your dress neckline, veil, or headpiece.
I’ve put together options that feel elegant and wedding-appropriate, from protective styles to natural looks that show off your texture.
Each one is designed to look amazing in photos and last through dancing, hugs, and warm weather.
1. Sleek Low Puff With Defined Edges

This look is clean, elegant, and very easy to wear, with a smooth base and a full puff at the back. It’s perfect if you want something simple that still looks bridal.
What you need
- Moisturizing leave-in (keeps hair soft and manageable)
- Edge control (defines edges for a polished finish)
- Soft bristle brush (smooths without snagging)
- Hair tie or puff cuff (secures the puff comfortably)
How to style it
- Step 1: Apply leave-in and lightly stretch hair with a few twists or a quick blow-dry on low.
- Step 2: Smooth the sides back with a brush and edge control.
- Step 3: Secure into a low puff with a puff cuff or hair tie.
- Step 4: Define edges and fluff the puff, then mist with a light holding spray.
Quick tip
Use a satin scarf for 10 minutes after brushing the sides back to help them set smoothly.
2. High Puff With Bridal Hair Comb

This style is bold, lifted, and beautiful, and a comb instantly makes it wedding-ready. It works great if you want your face open and your texture on full display.
What you need
- Leave-in conditioner (adds softness and slip)
- Styling gel (smooths the base for a clean finish)
- Puff cuff (holds the puff high and secure)
- Bridal hair comb (adds an elegant detail)
How to style it
- Step 1: Moisturize hair and smooth the perimeter with gel.
- Step 2: Use a brush to gather hair upward.
- Step 3: Secure with a puff cuff at the crown.
- Step 4: Fluff the puff and add the hair comb at the front or side.
Quick tip
Lightly stretch the puff with your fingers so it looks even and rounded in photos.
3. Natural Twist-Out With Soft Side Part

A twist-out looks romantic and full, with soft definition that feels effortless but still elegant. It’s perfect for brides who want to wear their hair down.
What you need
- Twist cream (helps define and moisturize)
- Lightweight oil (adds shine and reduces frizz)
- Wide-tooth comb (for gentle shaping)
- Decorative clip (optional, adds bridal detail)
How to style it
- Step 1: Prep hair with twist cream and do medium twists the night before.
- Step 2: Take twists down carefully and separate gently.
- Step 3: Create a soft side part and shape with your hands.
- Step 4: Add a light oil and clip one side if desired.
Quick tip
Separate twists with oiled fingertips so you get less frizz and more definition.
4. Defined Wash-and-Go With Side Clip

A wash-and-go can look very wedding-ready when the curls are defined and the shape is clean. This style is great if you want your natural texture with minimal pulling.
What you need
- Curl defining gel (creates definition and hold)
- Leave-in conditioner (keeps hair hydrated)
- Diffuser attachment (helps dry without frizz)
- Sparkly side clip (adds a dressy touch)
How to style it
- Step 1: Apply leave-in, then gel in sections for definition.
- Step 2: Smooth each section with your fingers to encourage clumps.
- Step 3: Diffuse on low until fully dry.
- Step 4: Shape the hair, then add a side clip above the ear.
Quick tip
Don’t touch your hair while it’s drying; it helps keep definition crisp.
5. Braided Crown Updo With Curly Top

This style keeps the sides neat with braids while letting your curls shine on top. It’s elegant, secure, and great for warm weather weddings.
What you need
- Moisturizing cream (keeps hair soft while styling)
- Edge control (clean hairline finish)
- Braiding hair (optional, adds fullness)
- Gold hair pins (optional, adds bridal shine)
How to style it
- Step 1: Section the perimeter and braid it into a crown shape.
- Step 2: Leave the top section out for curls or a puff.
- Step 3: Secure braids neatly and fluff the top section.
- Step 4: Add pins and smooth edges.
Quick tip
Ask your stylist to braid the crown slightly upward so it shows nicely in photos.
6. Low Bun With Sleek Sides and Curly Bangs

This look is classy and romantic, with smooth sides and a soft curly fringe in front. It’s a great option if you want an updo but still want softness around your face.
What you need
- Smoothing gel (sleeks the sides)
- Leave-in conditioner (keeps hair soft)
- Bobby pins (secures bun and curls)
- Curl sponge (optional, shapes curly bangs)
How to style it
- Step 1: Smooth sides back with gel, leaving a small front section out.
- Step 2: Gather hair into a low bun and secure it.
- Step 3: Shape the front section into curls and pin lightly if needed.
- Step 4: Set with a scarf for a few minutes, then finish with spray.
Quick tip
Keep the front curls soft and airy so they don’t look heavy in photos.
7. Half-Up Half-Down With Defined Curls

This style gives you volume and length while keeping hair off your face. It’s romantic, flattering, and works well with veils and hair combs.
What you need
- Curl defining cream (adds definition and softness)
- Hair elastic (secures the half-up section)
- Bobby pins (adds extra hold)
- Pearl pins (optional, bridal detail)
How to style it
- Step 1: Start with a twist-out or stretched wash-and-go.
- Step 2: Gather the top half and secure it gently.
- Step 3: Pin the half-up section for extra hold and lift.
- Step 4: Fluff the curls and add pearl pins near the back.
Quick tip
Lightly pick the roots at the crown so the shape looks balanced and full.
8. Braided Low Bun With Side Part

This style is protective, elegant, and holds up well all day. It’s perfect for bridesmaids or brides who want a neat, classic look.
What you need
- Braiding gel (clean parts and smooth grip)
- Rat-tail comb (creates neat sections)
- Bobby pins (secures the bun)
- Gold cuffs (optional, adds shine)
How to style it
- Step 1: Create a side part and braid hair into low braids.
- Step 2: Wrap braids into a low bun shape at the nape.
- Step 3: Pin the bun securely, hiding ends underneath.
- Step 4: Add cuffs and smooth edges.
Quick tip
If you want a fuller bun, use a few extra braids and wrap them wider.
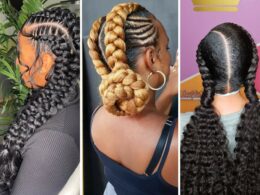
9. Fulani Braids With Curly Ends

Fulani braids look stunning for weddings, especially with curled ends for softness. This style is protective, stylish, and photo-friendly.
What you need
- Braiding hair (adds length and fullness)
- Edge control (neat hairline)
- Curling rods (creates curly ends)
- Beads or cuffs (optional, adds detail)
How to style it
- Step 1: Install Fulani braids with a center braid detail.
- Step 2: Leave ends loose or lightly curled for a softer finish.
- Step 3: Set ends with curling rods and warm water if needed.
- Step 4: Style edges neatly and add a few beads or cuffs.
Quick tip
Keep accessories light so they don’t weigh down the braids.
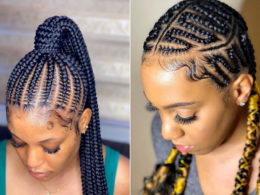
10. Glam Cornrow Updo With Curly Puff

This style is sleek on the sides with cornrows leading into a puff, which looks bold and elegant. It’s perfect for outdoor weddings and holds up well.
What you need
- Braiding gel (sleek cornrow base)
- Puff cuff (secures puff)
- Edge brush (neat hairline)
- Decorative pins (optional, adds bridal detail)
How to style it
- Step 1: Cornrow the sides and back toward the crown.
- Step 2: Gather the remaining hair into a puff.
- Step 3: Secure with a puff cuff and fluff the puff.
- Step 4: Define edges and add decorative pins.
Quick tip
Ask for smaller cornrows near the hairline for a more delicate, bridal look.
11. Flat Twist Updo With Pearl Pins

Flat twists look soft and elegant, and pearl pins make it feel bridal. It’s a great protective style that still looks romantic.
What you need
- Twist cream (adds slip and definition)
- Bobby pins (secures the updo)
- Pearl pins (adds bridal detail)
- Light holding spray (sets)
How to style it
- Step 1: Flat twist sections toward the back of your head.
- Step 2: Pin the twists into a low updo shape.
- Step 3: Tuck ends under and pin securely.
- Step 4: Add pearl pins and mist lightly.
Quick tip
Keep twist sections medium-sized so the look stays soft and not too chunky.
12. Afro With Floral Comb Accent

A shaped afro can look incredibly bridal, especially with a pretty floral comb. It’s bold, romantic, and perfect for brides who want to wear their texture proudly.
What you need
- Moisturizing cream (keeps hair soft and full)
- Pick comb (shapes and lifts roots)
- Light oil (adds a little shine)
- Floral comb (adds romantic detail)
How to style it
- Step 1: Start with stretched hair (twist-out, braid-out, or blown out).
- Step 2: Pick the roots gently to shape the afro evenly.
- Step 3: Add a tiny bit of oil to the ends for shine.
- Step 4: Place the floral comb on one side or near the crown.
Quick tip
Pick from underneath, not the top, so the surface stays smooth.
13. Braided Crown With Low Puff

This style combines a crown braid with a low puff, giving you structure and softness at the same time. It’s great for weddings because it feels elegant but still natural.
What you need
- Braiding gel (smooth crown braid)
- Puff cuff (secures puff)
- Edge control (neat hairline)
- Gold pins (optional, adds detail)
How to style it
- Step 1: Braid a crown section around the head.
- Step 2: Gather the rest into a low puff.
- Step 3: Secure with a puff cuff and fluff the puff.
- Step 4: Smooth edges and add pins near the braid.
Quick tip
Make the crown braid slightly thicker so it stands out in photos.
14. Sleek High Bun With Curly Pieces

This look has a sleek base with a full bun and a few curly pieces left out for softness. It feels formal and bridal, especially with a veil.
What you need
- Smoothing gel (sleeks the base)
- Hair elastic (secures the bun)
- Bobby pins (locks bun in place)
- Curl sponge (optional, shapes curly pieces)
How to style it
- Step 1: Smooth hair up with gel, leaving a small front section out.
- Step 2: Secure into a high bun and pin firmly.
- Step 3: Shape the front section into soft curls.
- Step 4: Set the base with a scarf, then finish with spray.
Quick tip
Keep the curls small and soft so they frame the face without taking over the look.
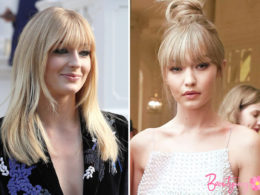
15. Knotless Braids Updo With Side Sweep

This is a protective style that looks elegant and bridal when styled into an updo. The side sweep keeps it soft and flattering.
What you need
- Knotless braids (installed beforehand)
- Hair elastic (secures the updo shape)
- Bobby pins (extra hold)
- Decorative clip (optional, bridal detail)
How to style it
- Step 1: Gather braids into a high or mid bun shape.
- Step 2: Sweep a few braids to the side for a soft front detail.
- Step 3: Pin and tuck ends so the bun looks clean.
- Step 4: Add a clip and smooth edges if needed.
Quick tip
Use a few pins at the base of the bun so it stays secure during dancing.
16. Bantu Knots With Curly Ends

Bantu knots can look very bridal when they’re neat and paired with curly ends or a soft twist-out finish. It’s a bold look that stands out beautifully.
What you need
- Styling cream (adds slip for clean knots)
- Edge control (neat hairline)
- Bobby pins (optional, extra security)
- Gold cuffs (optional, adds detail)
How to style it
- Step 1: Section hair evenly and apply cream to each section.
- Step 2: Twist each section and wrap it into a knot.
- Step 3: Secure knots with pins if needed and smooth edges.
- Step 4: Add cuffs or accessories and finish with a light spray.
Quick tip
Make your sections even so the style looks balanced in photos.